Product Optimisations
The purpose of this document is to centralize the information that we have found in the optimization process phase. So we discuss the whole process in this document.
Clean Project
Please remove all extra data like slices,fbx, sounds, unused scripts, etc from your project. It increases the size of the project as well as increases the build size too. We have purchased plugins like Find Reference 2 and used them to clean your project.
Compress Textures
To do this without modifying the actual source content, select the Texture in the Project view, and in the Inspector window reduce the Max Size. To see how this looks in-game, zoom in on a GameObject that uses the Texture, then adjust the Max Size until it starts looking worse in the Scene view. Set your image size square and set the unity suggested pixels. (32, 64, 128, 256, 512, 1024, 2048, 4096, 8192). If your image size is 567×890 pixels then set this image to a 1024×1024 pixels background transparent blank image and save it as a png file.
Then in the unity inspector set this image as a sprite and slice it by the sprite editor. This process will make your image size by reducing a minimum of 20%.
An example image and changes are given below.
Before: resolution 567×890 pixel, size 1.9MB After: resolution 1024×1024 pixel, size 1.3MB Result: size 0.6MB reduced, almost 32%.
Most texture compression format needs image in the power of 2 resolution (128, 256, 512, 1024, 2048). Resolutions 4096 and 8192 may not work on some android devices.
For example texture with no alpha in 1024×1024 resolution using RGB ETC2 compressions takes about 0,5MB in memory. Image 1280×800 with compression format RGB 16bit takes 2MB.
Compress Meshes And Animation Clips
Compress Meshes and imported Animation Clips so that they take up less space in your game file. To enable Mesh compression, select the Mesh, then in the Inspector window set the Mesh Compression to Low, Medium or High. Make duplicate animation from fbx and unparent the animation from the fbx and remove all the fbx from project that taking too much size in the build report.Below is the some key points
- Use optimize mesh data setting in unity project setting.This process use some algorithms to remove extra vertex and meta in your fbx.
- Tris count should be maximum 30k.
- Avoid detailed textures.
- Use solid colors for far objects
- Combine props/meshes/crowd planes (Combining meshes reduces fbx size)
- Build single character fbx and add multiple variations.
- Single fbx for multiple e nvironments
Compress Sounds
We have different categories in sounds i.e .wav , .mp3, etc . Please use mp3 and compress them and then import them into your project and apply the following. 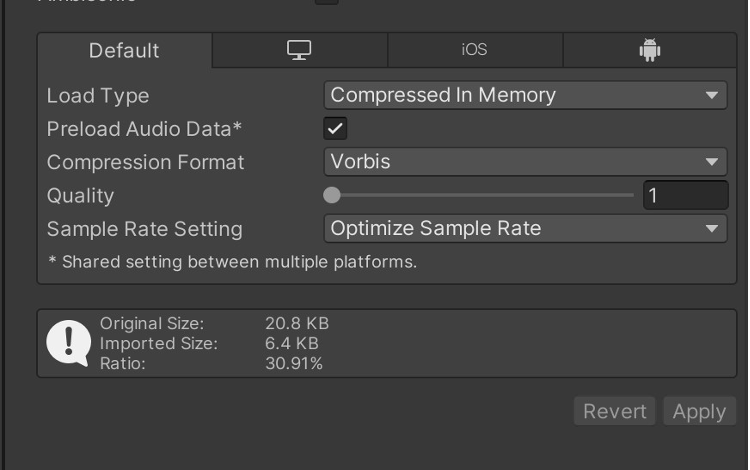
music and videos take up most of the size. Sound files should ideally be .mp3 format (otherwise .wav for very short clips).
Unity Players Setting
Api Compatibility Level
Unity supports two .NET API compatibility levels.: .NET 4.x and .NET Standard 2.0. The .NET Standard 2.0 restricts you to a smaller subset of the .NET API, which can help keep size down.I optimized Included DLLs from 13.4 MB to 9.5 MB by changing API Compatibility Level from .NET 2.0 to .NET 4.x.
Target Architecture
ARM and x86 are both processor architectures. x86 belongs to Intel while ARM is used by different companies (like Qualcomm). The vast majority of Android devices use ARM processors, with x86 being the runner up. When you build for ARM only you lose some of your target audience which might use Intel android
devices. (Unity stats says that Top on 2016-03: 98.7% Intel: 1.3%)
Strip Engine Code
Unity enables Strip Engine Code by default in the Player Settings and enables native code stripping. Enable Strip Engine Code to remove unused modules and classes in the native Unity engine code. Disable Strip Engine Code to preserve all of the modules and classes in the native Unity engine code.
Managed Scripting Level And Scripting Background(IL2CPP vs Mono)
During the build process, Unity removes unused or unreachable code through a process called managed code stripping, which can significantly decrease your application’s final size. Managed code stripping removes code from managed assemblies, including assemblies built from the C# scripts in your project, assemblies that are part of packages and plugins, and assemblies in the .NET Framework. Unity uses a tool called the Unity linker to perform a static analysis of the code in your project’s assemblies. The static analysis identifies any classes, portions of classes, functions, or portions of functions that can’t be reached during execution. This analysis only includes code that exists at build time because runtime generated code doesn’t exist when Unity performs the static analysis.
You can configure the level of code stripping Unity performs for your project using the Managed Stripping Level setting. To prevent Unity removing specific parts of your code, use annotations to indicate which parts of your code base the Unity linker should preserve. For more information, see Unity linker .https://docs.unity3d.com/Manual/unity-linker.html
You can change scripting backend in ProjectSettings -> Player -> Configuration to IL2CPP and in Optimiztion section set Managed Stripping Level to High. Tested it in Unity 2020.1.17f1 in Mobile template. Size reduced from 17Mb to 6Mb with empty scene only.
Use Proguard
Every time we build a new project, we see the following piece of code in the app-level build.gradle file
buildTypes { release { minifyEnabled false proguardFiles
getDefaultProguardFile(‘proguard-android-optimize.txt’), ‘proguard-rules.pro’
}
}
ProGuard makes the following impact on our project,
- It reduces the size of the application.
- It removes the unused classes and methods that contribute to the 64K method counts limit of an Android application.
- It makes the application difficult to reverse engineer by obfuscating the
Reuse Code
Object-Oriented Programming has solved a lot of problems in the programming world. Try reusing the code as much as possible instead of repetitive code.
Repetitive code also leads to increased file size thereby affecting the Apk size.
Using Lint
Lint actually helps in generating warnings or unused code inside the application. So this can actually help in removing the same thereby helping in reducing the
size of the application.
Reduce Size of Build-in Extras
Unity build in extras size can be reduced by applying following steps:
- Deleting the unity default asset like UI Masks,Sprites, Background,Transparent Images etc.
- Remove Resource folders of different plugins
- Delete extra Standard Assets at the time of project creation that are not used anywhere in the project.
- Size reduced from 1.3Mb to 700kb.
ShrinkResources
Reduce resources wherever possible. Using shrinkResources attribute in the Gradle will remove all the resources which are not being used anywhere in the project. Enable this in your app-level build.gradle file by adding below line:
buildTypes {
release { ……..
shrinkResources true ……..
}
}
What is R8 Shrinking?
R8 shrinking is a process in which we reduce the amount of code of our application and by doing so, the APK size automatically gets reduced. So, reduced APK sized applications are more likely to be kept in people’s phone. All we need to do is reduce the class files(i.e. the code) written in our Android application.
To reduce the APK size, we have three different techniques:
- Shrinking or Tree Shaking: Shrinking is the process of removal of unreachable code from our Android project. It performs some static analysis to get rid of unreachable code and removes the uninstantiated
- Optimization: This is used to optimize the code for size. It involves dead code removal, unused argument removal, selective inlining, class merging,
- Identifier Renaming: In this process, we obfuscate the class name and other variable names. For example, if the name of the class is
“MyAwesomeClass”, then it will be obfuscated to “a” or something else but smaller in size.
To enable R8 shrinking in your application, set the minifyEnabled to true in your app’s main build.gradle file.
android {
…
buildTypes {
release {
minifyEnabled false
}
}
}
Key Points While Building Environments
– Tris count should be maximum of 30k
-Avoid detailed textures
-Use solid colors for far objects
-Combine props/meshes/crowd planes (Combining meshes reduces fbx size) -PNG textures take more size, Manage transparent atlases in such a way so that they can be compressed to max without compromising quality.
-Use .png for transparent textures only. Always use .jpg for textures.
-Multiple textures are better than making one atlas for multiple environments. -Manage textures in such a way that near objects have different atlas and far objects have different. -This way we can compress far object’s atlas to maximum. -Single fbx for multiple environments. This way we can reduce size for similar items. For example ring being used in arena and indoor environment. -Use colors more in an environment, so that multiple variations can be made simply by changing color through shader.
-Use Lightmap’s maximum space with better resolution for near objects as compared to far objects, keeping max compression in mind.
Shader And Techniques
- Shaders are short programs that render graphics data.
- Individual Shader doesn’t output an entire image, nor do they always do Rather, there are different types of Shaders that do different things.
- Pixel Shader, Fragment Shaders, Vertex Shaders,Compute Shader, Surface Shader etc are the different types of shaders Unity add by default 42 shader in empty project.
Remove Uber.shader and Lit.shader(reduce size upto 7.8 MB)
Play Asset Delivery
PAD is a technique that allows users to have early access to the game without even downloading the whole bunch of assets. And users can download the assets as required later in the game.
Pros:
- Smaller size Build
- Quick access to game
- Improves downloads up 1000% (according to google)
- Easy to use.
- Smart assets bundle management.
- Can be modified according to the developer’s need.
- Super efficient.
- Smaller size updates.
- During the update whole apk will not be downloaded only the updated asset bundles will be downloaded from the server.
- No extra hosting charges (google server will host the asset bundles on the google play server)
- Proper feedback of downloading.
- Responsive code to check the download status.
- Proper notification of downloading status
Drawbacks:
- works on the play store (android only) 2. Internet availability is a must.
Intro To Asset bundles:
An AssetBundle is an archive file that contains platform-specific non-code Assets (such as Models, Textures, Prefabs, Audio clips, and even entire Scenes) that Unity can load at run time. AssetBundles can express dependencies
between each other; for example, a Material in one AssetBundle can
reference a Texture in another AssetBundle. For efficient delivery over networks, you can compress AssetBundles with a choice of built-in algorithms depending on use case requirements (LZMA and LZ4). AssetBundles can be useful for downloadable content (DLC), reducing initial install size, loading assets optimized for the end user’s platform, and reducing runtime memory pressure.
How to create asset bundles?
It is easy to create an asset bundle you can use this script to create as many asset bundles as needed.
- Place the above-mentioned script in the Editor folder in your project.
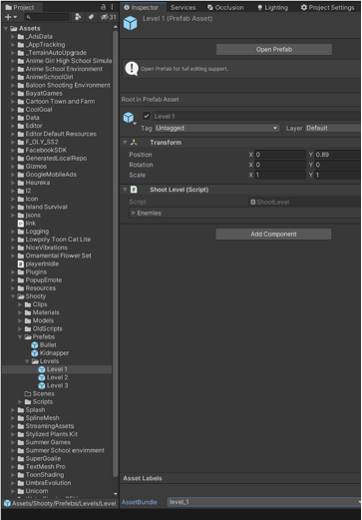
- Select a prefab or desired asset you want to archive as an asset bundle. You will see a small tab in the inspector window in the bottom named Asset bundleAsset Bundle -> New -> level1(asset bundle name)P.S asset bundle names should be all small
Before Naming the Asset bundle Once step 2 is done it will look like this. 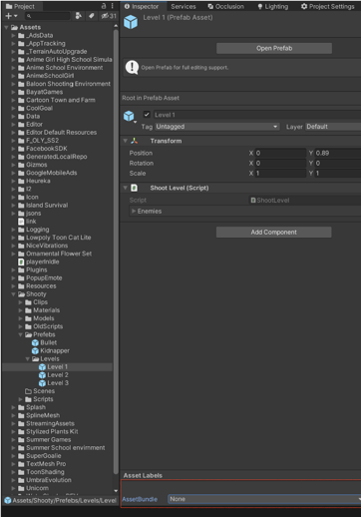
- Once done now you can go to the Asset window in the top of you screen and select build AssetBundles.

It will create the asset bundles on the path that is defined in the script mentioned in the setp2 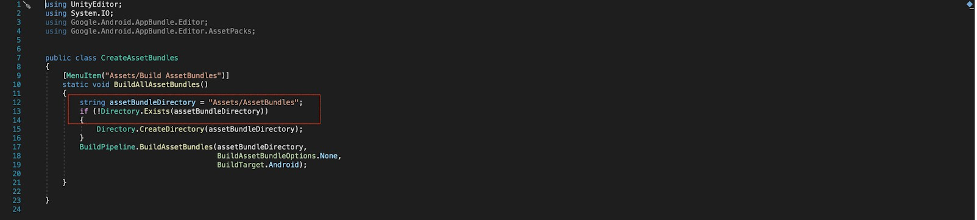
Once all your asset bundles are ready you can now move to Play asset delivery integration in your system.
Asset bundles are platform-dependent the mentioned script creates asset bundles for android which will work fine in the editor as well but some of the shaders will not be supported in the editor and they will be pink so don’t worry about it. They will work fine on the mobile devices.
Integration of PAD:
For the integration of PAD simply follow the following steps to integrate with the following step. I will be using an example from my game to download all my level prefabs into asset bundles. And using them with PAD.
P.S: You can use Asset delivery as you suit fit for your project.
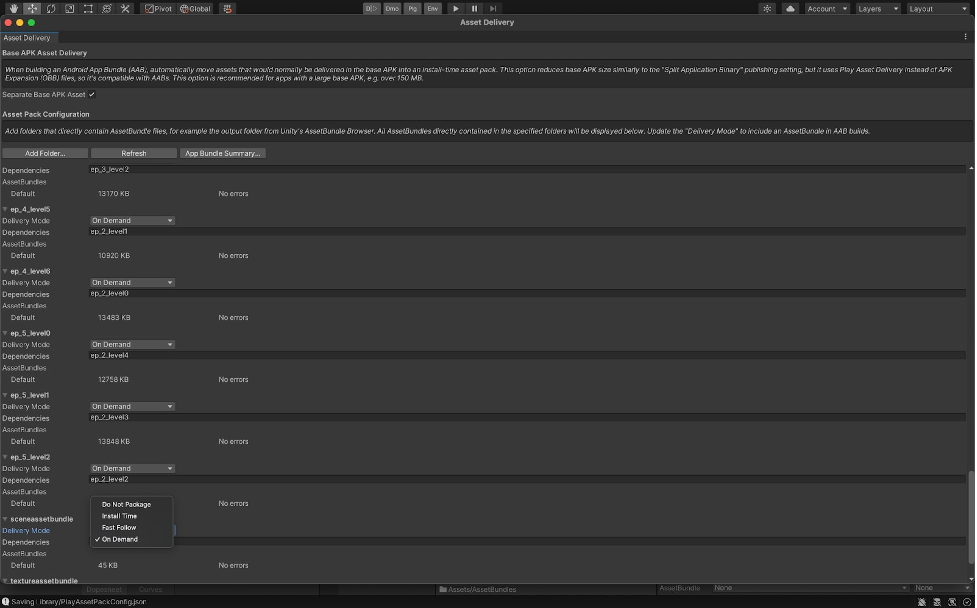
Before continuing it is must know there are three modes for PAD.
- Install time.
- On-demand.
- Fast flow.
All three of them do almost similar things with small differences. Install-time will download all asset bundles tagged as install-time at the time of installation. On-demand tagged assets will be downloaded as per user demand. Fast-flow works the same as on-demand but can also be run in the background. It is best to decide at the earliest point which type of assets you should tag and how should you manage them in your project. We will be working with on-demand in the following example.
Steps of integration:
- Download the Play asset delivery unity package from the mentioned link and import it into your project. (P.S) if this package is part of your project you will not be able to create a build for IOS. so it is recommended to remove the package before making IOS build).
- Package content create the following items.

You can simply un-check the external dependencies as they are already part of the project and we use them through the package manager.
P.S: this package is dependent on the following packages that are already part of your project app bundle, common, and core make sure to match the version with the following as paly.asset.delivery is
1.8.0 in this particular example you should use the same for rest of three packages.
Once you have created successfully created the asset bundles now can you move towards the packing and unpacking mechanism of your asset bundles in your game.
1- Packing
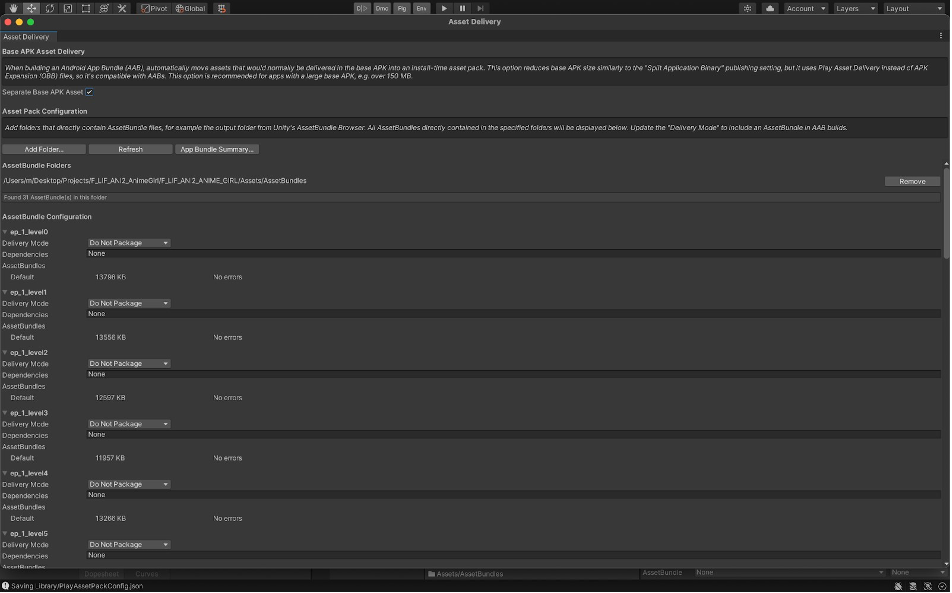
- Go to Google-> Android App Bundle -> Asset delivery system.
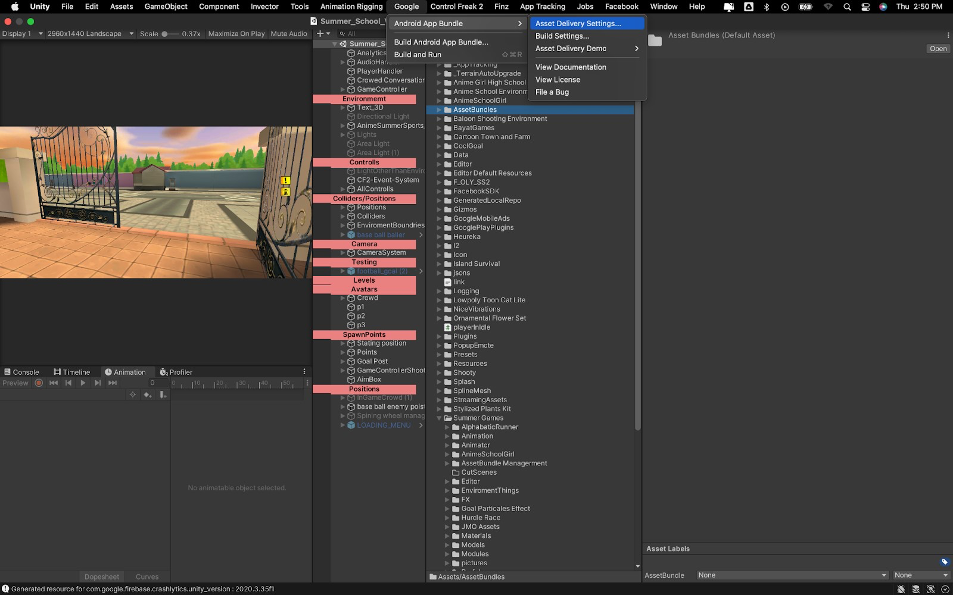
- Check Separate base Apk and add folder that contains Asset bundles (as per script Path will be “Assets/AssetBundles”)
- Check Separate base Apk and add folder that contains Asset bundles (as per script Path will be “Assets/AssetBundles”)
- Tag your asset bundles as needed.
You have successfully packed your asset bundles for your build.
2- Unpacking
We have now successfully completed the first part of the PAD second and the last part of the PAD is a bit tricky. So get your sources tight for this part Before moving on to unpacking you must know the life cycle of the PAD downloading and unpacking.
- You need only one script that is enough for managing your downloading, unpacking and updating your asset bundles
Editor

In the editor you can not write use PAD as the editor can not be linked to the google play server you need to find and load asset bundles from your folder. with the following method.
Code:
M1 :
public void RetriveBundlesInEditor(string BundleName)
{
var myLoadedAssetBundle
= AssetBundle.LoadFromFile(Path.Combine(“Assets/AssetBundles”,
BundleName)); if (myLoadedAssetBundle == null)
{
if (ShowLogs)
Debug.LogError(“Failed to load AssetBundle!”); return;
}
UnpackAndSaveBundle(myLoadedAssetBundle);
}
Mobile :
Use the following code to download assets for mobile devices.
Code:
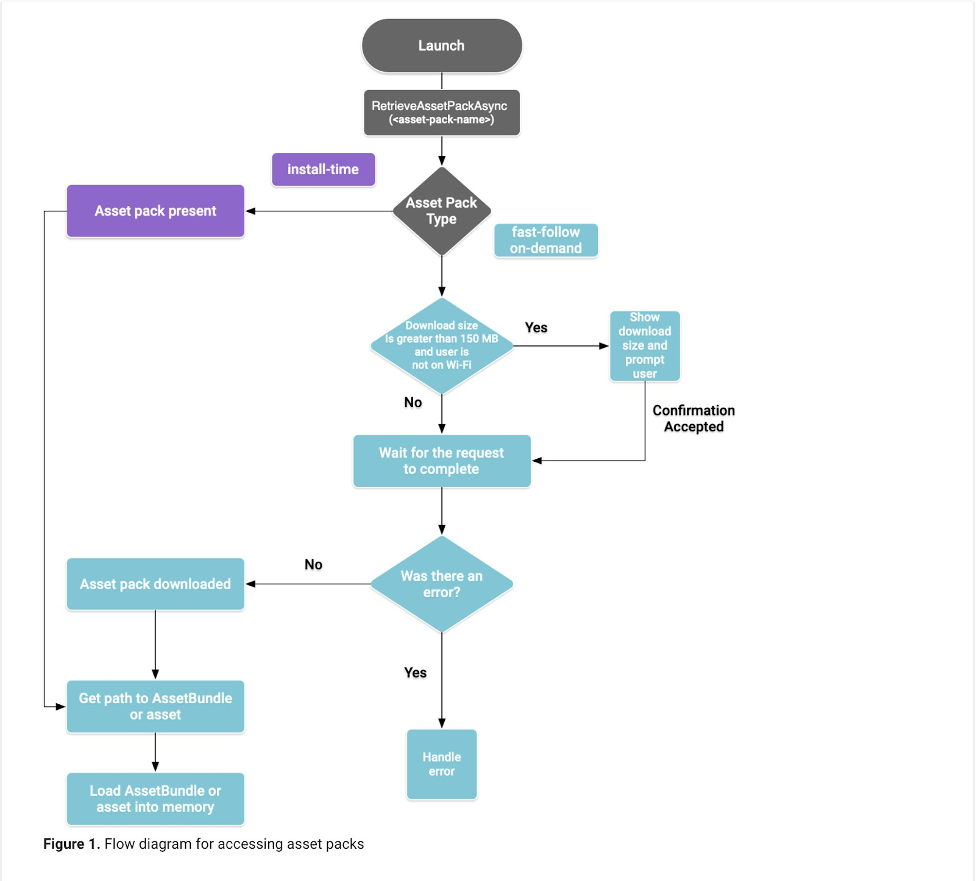
private IEnumerator LoadAssetPackCoroutine(string assetPackName) {
PlayAssetPackRequest request =
PlayAssetDelivery.RetrieveAssetPackAsync(assetPackName);
while (!request.IsDone) { if(request.Status == AssetDeliveryStatus.WaitingForWifi) { var userConfirmationOperation =
PlayAssetDelivery.ShowCellularDataConfirmation();
// Wait for confirmation dialog action. yield return userConfirmationOperation;
if((userConfirmationOperation.Error != AssetDeliveryErrorCode.NoError) ||
(userConfirmationOperation.GetResult() !=
ConfirmationDialogResult.Accepted)) {
// The user did not accept the confirmation – handle as needed.
}
// Wait for Wi-Fi connection OR confirmation dialog acceptance before moving on.
yield return new WaitUntil(() => request.Status != AssetDeliveryStatus.WaitingForWifi);
}
// Use request.DownloadProgress to track download progress. // Use request.Status to track the status of request.
yield return null;
}
if (request.Error != AssetDeliveryErrorCode.NoError) {
// There was an error retrieving the pack. For error codes NetworkError
// and InsufficientStorage, you may prompt the user to check their // connection settings or check their storage space, respectively, then // try again.
yield return null;
}
// Request was successful. Load the asset pack into memory.
AssetBundleCreateRequest assetBundleCreateRequest = request.LoadAssetBundleAsync(path/to/exampleBundle); yield return assetBundleCreateRequest;
AssetBundle assetBundle = assetBundleCreateRequest.assetBundle;
For more information check this link.
- Once you have the Asset bundle you can unpack the asset bundles and use them in your project as intended( write your own logic for this )
To unpack the asset bundle uses the following code :
Code:
public GameObject UnpackAndSaveBundle(AssetBundle bundle)
{
GameObject[] Level = bundle.LoadAllAssets<GameObject>(); bundle.Unload(false);
GameObject Prefab = Level[0] return Prefab;
}
That will be all.
For further details, look at the detailed scripts I am placing at this link.
Link
For More details studies do look into these links below:
Build And Testing WIth PAD.
Once you are done with your project and all integration it is time to create the build for your project and test.
With PAD, we can not make the simple build we create previously.
Local Testing
For local testing attach the device to your system and go to the following tab.
Google-> Build and Run. and you are all set to test your build locally.

Testing with internal app sharing
As you get closer to having a release candidate, test your game using as realistic a configuration as possible to make sure that your game will perform well for your users in production. To validate this, you can use internal app sharing to get a shareable link that you can use to download the game from Play while getting the exact same behavior as your users will once the game is published to the Play Store.
To test Asset Delivery using internal app sharing, do the following:
- Build your app bundle.

- Follow the Play Console instructions on how to share your app internally .
- On the test device, click the internal app-sharing link for the version of your app you just uploaded.
- Install the app from the Google Play Store page you see after clicking the link You can also test your game through beta testing through GPFor more details check this link.
Join our newsletter
Volutpat vel turpis nulla lorem sed semper. Aliquam sagittis sem libero viverra vehicula nullam ut nisl.


